Tuesday, February 4, 2014

Swag Bars


There is a lovely place called The Swag Country Inn, in Waynesville, North Carolina.
It is a wonderful little inn, with the best hiking trails I have ever been on.  You can spend
an entire day hiking, which builds up quite an appetite.  The staff at The Swag, are not going 
to send you into The Great Smokey Mountains, without a hearty, gourmet backpack lunch.  The lunch
that they pack for you is delicious, but The Swag is famous for these dessert bars that 
everyone gets as part of their lunch.  Not only are they crunchy, chocolatey, and the perfect
end to an amazing lunch, somehow, they give you the energy to continue hiking for the rest of
the afternoon.  Usually a midday dessert would make me sluggish, and ready for a nap, but not these.  

By our 3rd stay at the inn, we knew to request a 2nd bar in our lunch pack.  It was also by that visit, that The Swag started giving out the recipe, which I was so excited to get!  

I couldn't believe how simple it was.  Of course, within 2 days of getting home with the coveted recipe, I had to try it.  Yup!  They were just as good as the ones from The Swag.  They quickly became part of my regular baking menu, and the requests from friends, family and my tennis team, came pouring in.  There is something about these bars that is addictive!  Luckily, they take less than 10 minutes to prepare, they can be made from ingredients that can be kept in the pantry for weeks, and they freeze beautifully.


Swag Bars

1 cup white sugar
2 cups peanut butter
1 8oz package of chocolate chips
1 cup white Karo syrup
6 cups crumbled corn flakes

Put sugar, syrup and peanut butter in a large heavy pan. Heat until very hot, almost to boil, and stir constantly. 

Take off stove, mix in scrunched corn flakes. Mix well. 

Press lightly into oiled pan (9x13). Sprinkle chocolate chips evenly over the top. They will melt after a while but, to speed up the process, put in a 350 degree oven for a few minutes. 

Score the bars while still hot, they are hard to cut when cool. These freeze well.


Wednesday, January 29, 2014

Turning Lemons Into Lemonade


I hope you are not expecting a recipe for lemonade today.

Sadly, I just finished unpacking for my trip to NY. The weather in Atlanta made it impossible to travel today and tomorrow is going to be such a hassle trying to get to the airport, I finally decided to postpone the trip until the end of Feb. That's the bad news.

The good news is that I now have four whole days with NO plans...nada....nothing...zip!  So what is a girl to do with 4 free days, an upcoming Super Bowl, and seven 18 year old boys who will be watching the game at my house?  You know where this is going....

Super Bowl snacks!!!!!

I have many times discussed my embarrassing love of bar food (nachos, chicken fingers, cheesy dips, onion rings, etc.). So, of course, I always have a stockpile of recipes that I want to try, but never really do, because I try to serve my family meals that have some nutritional value.

I could easily spend hours pouring over recipes and browsing Pinterest for ideas, but I decided to make it easy on myself. The boys have already ordered a big platter of wings, so I am not under too much pressure to produce large quantities of food. Joey's friend was over for dinner, so I asked the two of them what I should make. While they were thinking I blurted out, "Nachos!". That was met with approval. Then, I remembered that I am currently taking a Wilton Method Cake Decorating class, and I need practice, so I also offered, "A football cake!". Done.

The nachos need no recipe. I am going to start by preparing some chili that is spicy, tangy and a touch sweet , kind of like sloppy joe meat.  It is amazing on nachos. Then I'll begin layering the hot toppings....tortilla chips, sharp cheddar, chili, and pickled jalapeƱo slices. Pop it in the oven until the chips toast a little and the cheese is melted and bubbling. Next comes the cold toppings.... tomatoes, sour cream, onions, salsa, lettuce, fresh cilantro and homemade guacamole. Heaven!

For dessert (and cake decorating homework), I am going to make rich chocolate cupcakes and decorate the top to look like a football.  It will look something like this:


You can find this recipe at The Baker Chick.

I am quite sure that I will begin to feel guilty on Sunday morning, and will end up sending Phil out to get as many veggies as he can for a raw veggie tray. I will  most likely whip up a secretly healthy dip (any dip can be made healthy by substituting all or some of the sour cream/mayo with non fat, plain Greek yogurt).

This is how I turn lemons into lemonade.

Stay safe to all everyone in Atlanta!

Sunday, January 26, 2014

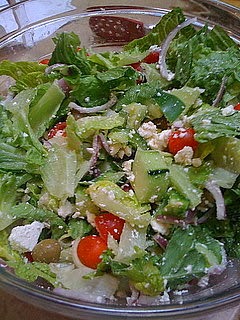
The Perfect Greek Salad


Hi Everyone! I am a little late in my promise to post one recipe a week in 2014, but I'll make it up with a few extra posts in February.

I grew up eating Greek salads, both at home and when dining out at the local diners. There are so many variations that it would be impossible to list them all, but this is the perfect base to start with. Personally, I am very content eating a large bowl of this salad with a nice, toasty piece of pita, but the men in my house require more substance. I will then simply top the salad with a great piece of grilled protein (chicken and lamb work very well here).  The salad will stay fresh in a plastic container in the refrigerator for 5 days (keep the dressing on the side), so it also makes a delicious and quick lunch for the week.

The Perfect Greek Salad


Dressing:
3/4 C. extra-virgin olive oil
2-3 T. fresh lemon juice
3 T. dried oregano
3 tsp. fresh minced garlic
1 tsp. dried basil
2 T. red wine vinegar
1 tsp. sugar
kosher salt and fresh ground pepper to taste


Put all ingredients into a blender and blitz for 30 seconds.


Salad:
Romaine lettuce, torn into small pieces
Cherry tomatoes, cut in half
English cucumber, sliced
Red onion, sliced
Any type of salty olives, pits removed
green pepper, chopped
good Greek feta cheese, crumbled
peppadews (similar to sweet cherry peppers, but with a little spice)


Toss all ingredients together right before serving.  Serve with freshly heated pita rounds.

Monday, July 1, 2013

Welcome to our new blog address


Welcome to the new Cooking In Pajamas blog site.  I was having technical difficulties at On Sugar, so to make a long story short, here I am!

You can still go to cookinginpajamas.onsugar.com to find all of my previous posts and recipes.  

Thanks for all of your support and loyalty!

Gwenn

Sunday, June 2, 2013


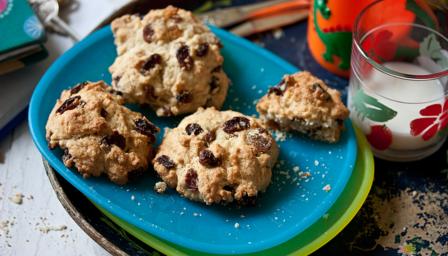
I was getting a little bored with the book I am currently reading. It takes place in England, around 1910.  There was a scene described where the housekeeper calls the family children to afternoon tea. One of the kids wouldn't come until his sister told him that the housekeeper made Rock Buns. As soon as he heard that, he came running for his afternoon snack.

I was intrigued. What the heck is a rock bun?  I decided to google it and discovered that they are a common tea time treat in Great Britain.  They are very similar to a scone and incredibly easy to make.  The traditional English way to make it is with the addition to dried fruit, so I added raisins to mine. I also threw in some coconut.   Once you have the basic recipe, I imagine you could add in almost anything that you would add to a scone....dried strawberries (not fresh...too soggy), chocolate chips, peanut butter chips, dried blueberries (again...not fresh), dried cherries, lemon zest, etc.

They came out delicious. I left them on a plate in the kitchen, and by the end of the day they were almost all gone.

Rock Buns
Makes 6 rock buns


2 cups all purpose flour, sifted
½ cup soft margarine
½ cup brown sugar
4 Tbsps. raisins
1 teaspoon baking powder
2 medium eggs
1 teaspoon vanilla
4 tsps. milk
½ cup shredded coconut

1. Preheat oven at 360°F / 190°C. Grease baking sheet.
2. Using the finger tips, rub fat into sifted flour until mixture resembles fine breadcrumbs.
3. Add sugar, raisins, baking powder and coconut, mix in evenly.
4. Beat eggs and vanilla. Pour into flour mixture and combine then add milk slowly.
5. Combine mixture with the hands until a moist dough is formed.
6. With a spoon and a fork, divide dough into six equal pieces and shape each piece into a “rocky cone” on the greased baking tray.
(Although the recipe doesn’t call for it at this point I sprinkle the buns generously with brown sugar  )
7. Bake for 15 minutes or until done.